Introduction
15 December 2020 |
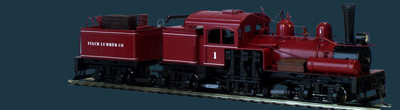
It has been almost fifteen years since I last added a page to this project site. This was prompted by a question and plea for help from South Africa. A fellow modeler there had acquired an MDC Shay kit not being aware of any of those kits being of anything else but standard gauge. So Murphy struck again. When opening the box much to his horror he found that he had bought a HOn3 version. He contacted me how to go about this. I have an HOn3 kit lying in my stash of unbuilt kits so I decided to have a look.
Converting these kits to standard gauge is surprisingly simple. |

This truck is showing the gap to be bridged if you want to convert from HOn3 to standard gauge |
Necessities
No need for an endless list of necessities
- Brass or steel rod 2.4 mm diameter (axles)
- Brass or steel rod 3.0 mm diameter (sideframes)
- Brass tube with a minimum 2.5 inner diameter, and appr. 0.5 mm wall thickness (the latter not really critical)
- 5 minute 2-component epoxy glue
That's it, really!
In terms of tooling I assume you have
- a good supply of drills of all sizes;
- a Proxxon drill on a drill press is helpful
- or alternatively if you have a steady hand a simple hand drill will do.
- a saw and some files
- a decent set of calipers to measure.
|

Hand drills will do the job if you have a calibrated eye and a steady hand. |
| All in all nothing out of the ordinary for any modeler. You will need these tools anyway if you aspire to build this Shay. |
Axles
Well, let's get to work. What do we have in the HOn3 kit? |
 |
 |
| The truck main frame as supplied with the HOn3 version of the MDC Roundhouse Shay |
To obtain a wider gauge the axles of the Shay need to be replaced. To determine the length of the new axle we need to do some math.
- The back-to-back distance of the wheels on the HOn3 axles was 8.7 mm (0.346") which is a tad on the low side according to the NMRA norm.
- The NMRA norm for HO back-to-back distance is 14,55 mm (0,573").
- So the axle needs to increase in length by 14,55 minus 8,7 mm = 5,85 mm.
- The old axle length is 14,40 mm so the new axle length should be 20,25 mm.
|
 |
 |
Making the axles is a simple job.
Take a piece of brass or steel rod of 2.4 mm diameter (0,094") cut and file it to 20.3 mm (0.797") and chamfer the edges slightly. The chamfers take away the sharp edge that will eat into the plastic wheel centres if you press the axle on the wheels. If you want to do a proper job you could do the chamfering by putting the axle in a drill chuck and spin it while holding a file lightly against it. |
 |
 |
Now pull the wheels off the HOn3 axle.
Using a wheel puller (left) is an option if you have one, but you can also use two scraps of thicker sheet metal under the wheel in the vise and gently tap the axle out with a suitably thin punch or piece of rod. |

The wheels needed a bit of persuasion, the gear slid off with relatively little pressure. |
Spacers
|
Again this is an simple job. The simplest way is to find a length of brass tube with an inner diameter of 2.5 mm (0.098") or a bit more. Cut and file lengths of 2.9 mm (0.115"), that is the added width as a result of the longer axle on each side.
It is also possible to drill this from solid 3.0 mm brass rod, but it is fiddly work if you do not have a lathe. |
 |
HO axle assembly |
 The longer axle and its two additional spacers |
 |
- Gently tap the new axle into one wheel ensuring all is square when you do so. Tap until you the brass rod comes flush with the outer wheel face.
- Slide one spacer over the axle
- Slide the gear on and position it midway
- Slide another spacer over the axle
- Finally gently tap the axle into the second wheel keeping everything square. Tap until you the brass rod comes flush with the outer wheel face.
- Check the back-to-back distance, 14.55 mm, and correct if necessary.
|

|
 |
 |
Truck sideframes
The is the most "difficult" part of the conversion, but do not be put off. It is all still relatively easy. If you want to build this Shay the following exercise only requires skills you will need anyway. |
 |
The wheels have now come out 5,85/2 = 2,93 mm (0.115") to each side and they will foul the truck sideframes. So the truck sideframes need move away from the truck mainframe by a same amount.
The truck sideframes have two spigots with which they are attached to the truck frame. The part of 2.0 mm (0.079") diameter is actually inserted into the truck frames, the part of 3.0 mm (0.118") diameter acts as a spacer between the truck mainframe and the truck sideframe.
The purpose of the following exercise is to lengthen the spacer part, so more room is created for the widened wheelbase to fit in.
|
 |
 |
- Snip the thin end off (see the yellow line in the previous photo)
- File the spigots flat against the start of the thick end
- Mark the start of a hole exactly in the middle of the spigot with a sharp pin. It is important that it as exact in the middle as you possibly can. Eyeballing is good enough though.
- Drill a pilot hole of 1,0 mm wide
- then followed by a drill of 2.0 mm wide
|
 |

The dimensions of the spigot extension.
The thick part is the extension proper.
On one side the thinner end is glued in the hole you made in the original spigot.
The other side is inserted into the truck's mainframe. |
Then make a spigot extension from 3.0 (0.118") mm brass rod, following the dimensions in the drawing. You can turn the rod by running it in a drill chuck and holding a file against it. Check the dimensions frequently. With some practise you can get pretty accurate results. The first one will take some time but the consecutive spigots will go faster and faster. If you have a lathe the work is easier but it is not necessary. It is also possible to make the spigot from styrene rod if you like. Works faster but is less robust.
When done glue the spigot extension in the hole you made in the spigot with 5-minute epoxy.
The fit the truckframe with the extended spigots in the truck mainframe to see if it all fits. |
Repeat the work for all axles and spigots and you are done! |

Sign my
GuestBook